作者 Reverse by June 2, 2022
Python日记 -- 百度OCR翻译
前言
最近写了个 丐版 的 百度 OCR 翻译 ,其实网络上也有很多类似的源码。
该教程为 简化版 ,详细查看 技术文档 , 支持 python 版本 2.7.+ 和 3.+ 。
效果展示
百度OCR
准备工作
-
创建 通用场景OCR ,应用归属 选择 个人 , 应用名称 和 应用描述 自定义
-
填完以上信息后,点击 立即创建 (注意要实名认证)
-
此时,应用列表 会出现 刚创建好的应用 ,分别把 AppID 、 API Key 和 Secret Key 记录好 等下用
核心代码
- 当前版本为 python 3.8.1 (PIL 在 python3 时,第三方库应安装 pillow)
    # 截图
    import keyboard
    import time
    from PIL import ImageGrab


    keyboard.wait(hotkey='ctrl+c')      # 触发按键

    time.sleep(0.01)                    # 延迟

    # 保存图片
    image = ImageGrab.grabclipboard()
    image.save('OCR.png')               # 图片命名为'OCR.png'
- 安装 OCR Python SDK
pip install baidu-aip
- 配置 OCR
- 配置AipOcr ,把在 准备工作 获取的 AppID 、 API Key 和 Secret Key 对应填入
  # 配置AipOcr
  from aip import AipOcr

  APP_ID = '你的 App ID'
  API_KEY = '你的 Api Key'
  SECRET_KEY = '你的 Secret Key'

  client = AipOcr(APP_ID, API_KEY, SECRET_KEY)
  def get_file_content(filePath):
      with open('OCR.png', "rb") as fp:
         return fp.read()

   image = get_file_content('OCR.png')

   # 调用通用文字识别(标准版)
   res_image = client.basicGeneral(image)
   print(res_image)
- 删减 + 筛选数据
      with open('OCR.png', "rb") as fp:
        image = fp.read()

        # 调用通用文字识别(标准版)
        res_image = client.basicGeneral(image)
        # print(res_image)

        # 筛选数据
        res = res_image['words_result']
        for i in res:
            print(i['words'])
有道翻译
- 用到了 爬虫 , 网上有教程,不细说
import requests
import json
import time
import random
import hashlib


# 网址
url = 'https://fanyi.youdao.com/translate_o?smartresult=dict&smartresult=rule'

# 反爬
header = {
    'User-Agent': 'Mozilla/5.0 (Windows NT 6.1; Win64; x64) AppleWebKit/537.36 (KHTML, like Gecko) Chrome/102.0.0.0 Safari/537.36',
    'Cookie': 'OUTFOX_SEARCH_USER_ID=1870252624@10.110.96.157; OUTFOX_SEARCH_USER_ID_NCOO=1338974472.751384; ___rl__test__cookies=1654489795853',
    'Referer': 'https://fanyi.youdao.com/'
}

# 时间戳
r = str(int(time.time()*1000))
# print(r)

# 随机数
random_num = random.randint(0,9)
i = r + str(random_num)
# print(i)

def data_new(e):
    # md5
    str_sign = "fanyideskweb" + e + i + "Ygy_4c=r#e#4EX^NUGUc5"
    md5 = hashlib.md5()
    md5.update(str_sign.encode())
    sign = md5.hexdigest()
    # print(sign)

    data_old = {
        'i': e,
        'from': 'AUTO',
        'to': 'AUTO',
        'smartresult': 'dict',
        'client': 'fanyideskweb',
        'salt': i,
        'sign': sign,
        'lts': r,
        'bv': 'dbf26599b4389c828cae8b896c9b0708',
        'doctype': 'json',
        'version': '2.1',
        'keyfrom': 'fanyi.web',
        'action': 'FY_BY_REALTlME'
    }
    return data_old


a = input('请输入需要翻译的内容:\n')
data = data_new(a)

# 请求
result = requests.post(url,headers=header,data=data).text
# print(result)

# 数据筛选
dict_res = json.loads(result)
print(dict_res['translateResult'][0][0]['tgt'])
补充
拓展
- 增加 复制 和 弹窗 功能
加了些花里胡哨的东西
    import pyperclip
    import tkinter as tk


    # copy
    pyperclip.copy(a + '\n' + b)
    time.sleep(0.02)
    # 弹窗
    root = tk.Tk()
    root.title("info")
    tk.Label(root, text="已复制", ).pack()       # 弹窗显示
    root.after(1000, lambda: root.destroy())    # 停留1s
    root.mainloop()
打包前 完整代码
- 演示版本为 python 3.8.1 , 如出现报错请自行解决
# 工程:test
# 创建时间:2022/6/2 11:41
# encoding:utf-8


import keyboard
import time
import requests
import random
import hashlib
import json
import configparser
import pyperclip
import tkinter as tk
from PIL import ImageGrab
from aip import AipOcr


# 读取ini文件
aip = 'OCR.ini'
conf = configparser.ConfigParser()
conf.read(aip)

# 配置AipOcr
APP_ID = conf.get('aip', 'APP_ID')              # 你的 App ID
API_KEY = conf.get('aip', 'API_KEY')            # 你的 Api Key
SECRET_KEY = conf.get('aip', 'SECRET_KEY')      # 你的 Secret Key

client = AipOcr(APP_ID, API_KEY, SECRET_KEY)

while True:
    #   --------------- 截图识别 --------------
    # 截图
    keyboard.wait(hotkey='ctrl+c')      # 触发按键

    time.sleep(0.01)                    # 延迟

    # 保存图片
    image = ImageGrab.grabclipboard()
    image.save('OCR.png')               # 图片命名为'OCR.png'
    print('识别中...')

    with open('OCR.png', "rb") as fp:
        image = fp.read()

        # 调用通用文字识别(标准版)
        res_image = client.basicGeneral(image)
        # print(res_image)

        # 筛选数据
        all_text = ''
        res = res_image['words_result']
        for i in res:
            all_text += i['words'] + '\n'
        a = all_text
        print(a + '-' * 70)

    #   --------------- 有道翻译 --------------
    # 网址
    url = 'https://fanyi.youdao.com/translate_o?smartresult=dict&smartresult=rule'

    # 反爬
    header = {
        'User-Agent': conf.get('config', 'User-Agent'),
        'Cookie': conf.get('config', 'Cookie'),
        'Referer': 'https://fanyi.youdao.com/'
    }

    # 时间戳
    r = str(int(time.time() * 1000))
    # print(r)

    # 随机数
    random_num = random.randint(0, 9)
    i = r + str(random_num)
    # print(i)


    def data_new(e):
        # md5
        str_sign = "fanyideskweb" + e + i + "Ygy_4c=r#e#4EX^NUGUc5"
        md5 = hashlib.md5()
        md5.update(str_sign.encode())
        sign = md5.hexdigest()
        # print(sign)

        data_old = {
            'i': e,
            'from': 'AUTO',
            'to': 'AUTO',
            'smartresult': 'dict',
            'client': 'fanyideskweb',
            'salt': i,
            'sign': sign,
            'lts': r,
            'bv': conf.get('config', 'bv'),
            'doctype': 'json',
            'version': '2.1',
            'keyfrom': 'fanyi.web',
            'action': 'FY_BY_REALTlME'
        }
        return data_old

    data = data_new(a)

    # 请求
    result = requests.post(url, headers=header, data=data).text
    # print(result)

    # 数据筛选
    dict_res = json.loads(result)
    b = dict_res['translateResult'][0][0]['tgt']
    print(b + '\n')

    # copy
    pyperclip.copy(a + '\n' + b)
    time.sleep(0.02)
    # 弹窗
    root = tk.Tk()
    root.title("info")
    tk.Label(root, text="已复制", ).pack()       # 弹窗显示
    root.after(1000, lambda: root.destroy())    # 停留1s
    root.mainloop()
- 创建 OCR.ini 文件,复制以下内容 , 把在 准备工作 获取的 获取的 AppID 、 API Key 和 Secret Key 对应填入
[aip]
APP_ID =
API_KEY =
SECRET_KEY =

[config]
User-Agent = Mozilla/5.0 (Windows NT 6.1; Win64; x64) AppleWebKit/537.36 (KHTML, like Gecko) Chrome/102.0.0.0 Safari/537.36

Cookie = OUTFOX_SEARCH_USER_ID=1870252624@10.110.96.157; OUTFOX_SEARCH_USER_ID_NCOO=1338974472.751384; ___rl__test__cookies=1654489795853

bv = dbf26599b4389c828cae8b896c9b0708
- 最后自行打包 (不打包在pycharm里也能用)
  pyinstaller -F 文件名.py

  # pyinstaller -F 文件名.pyw
打包后 使用教程
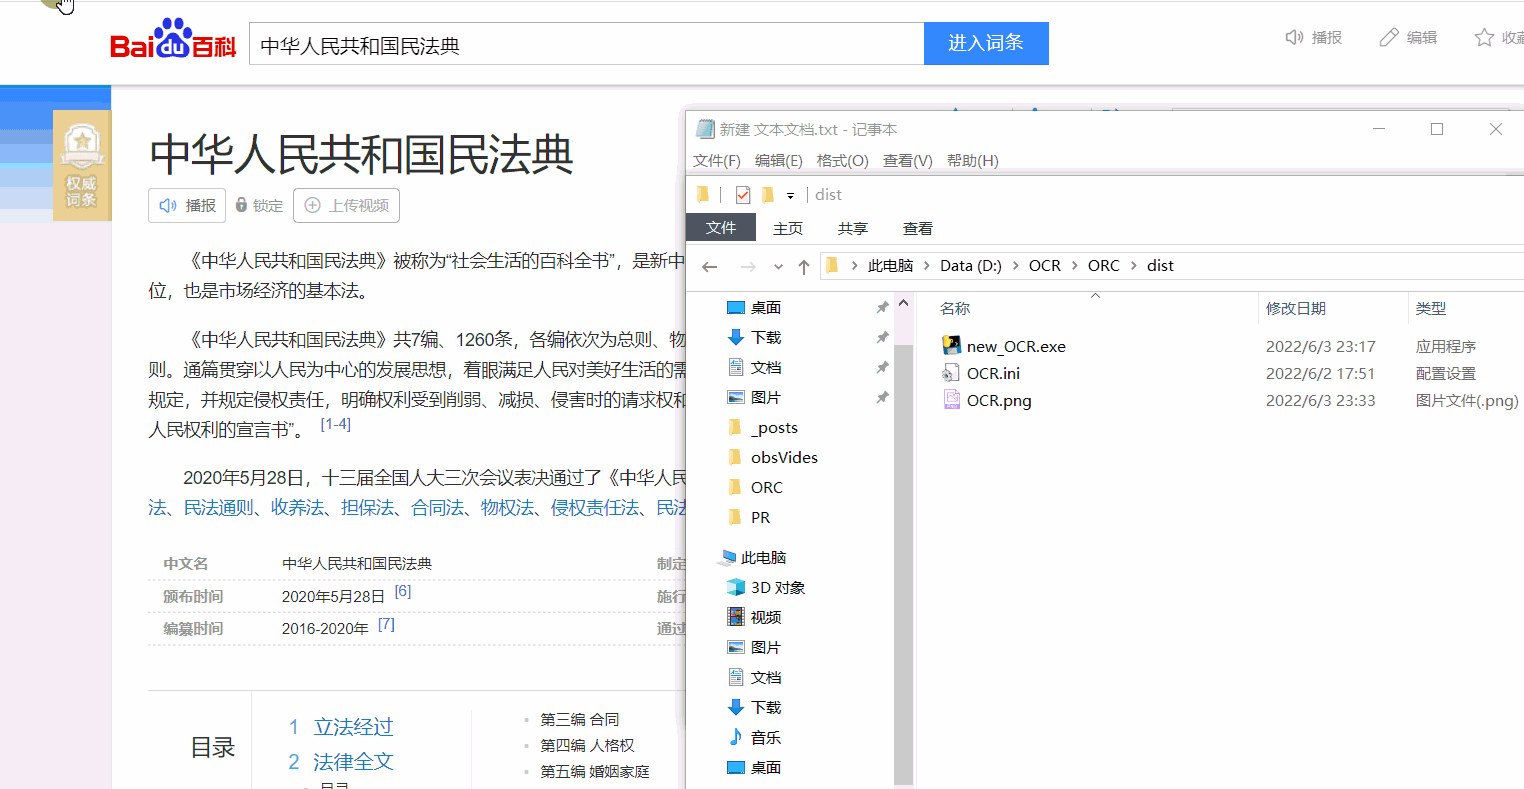
- 打开 new_OCR\dist\OCR.ini 文件,把在 准备工作 获取的 AppID 、 API Key 和 Secret Key 对应填入 , 运行exe文件 即可
[aip]
APP_ID =
API_KEY =
SECRET_KEY =
- 如出现闪退 / 想换成自己的 , 请 / 可 更换以下内容
[config]
User-Agent =

Cookie =

bv =
-
方法如下
-
F12 打开 开发者工具 ,选择 Network , 然后选择 XHR
-
在 翻译框 输入任意 文字 ,页面 会出现 translate_ (如有多个选最新)
-
点击 translate_ ,在 Headers 页面可以找到 User-Agent 和 Cookie ,在 Payload 页面可以找到 bv (火狐浏览器的 bv 在请求页面)
-
把找到的内容 替换 ini 文件内容 ,重新运行 即可
-
如 不清楚文字描述 可按 如图 1 所示 步骤 即可

图 1
最后
这个百度 OCR 只能翻译第一行的内容,多行无法翻译
个人版的调用次数已经够用了,不建议多对一,建议一对一
您的喜欢是作者写作最大的动力